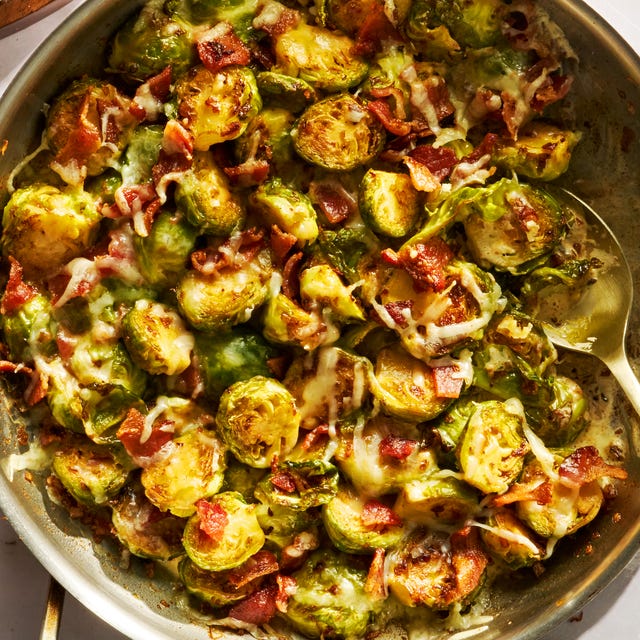
Recipe: Slow Cooker Honey Garlic Chicken

Recipe: Slow Cooker Honey Garlic Chicken

Slow Cooker Honey Garlic Chicken

Skill Level

Low

Time

3-6 hours

Serves

4

Calories

316

Protein

40g

Fat

5g

Carbs

28g

Equipment Needed

Ingredients

  • 1.5 lbs (680 grams) Chicken Breast (boneless, skinless)
  • 1/3 cup Soy Sauce, low-sodium
  • 1/3 cup Honey
  • 1 Tbsp Chili Flakes
  • 4 Garlic (cloves, sliced finely or pressed)
  • 1 Tbsp Rice Vinegar (Apple cider or white wine vinegar work too)
  • 2 Tbsp Cornstarch


Instructions

Step 1

In a mixing bowl, whisk your sauce ingredients together (soy sauce, honey, chili flakes, vinegar, garlic)

Step 2

Put chicken in slow cooker and pour sauce over the chicken.

Step 3

Cook on LOW for 4-5 hours (5-6 hours if chicken frozen) or HIGH for 2-3 hours (3-4 hours if chicken frozen).

Step 4

Remove the chicken and shred with fork and knife.

Step 5

Thicken sauce: add cornstarch directly into the slow cooker and whisk until sauce thickens.

Step 6

Return chicken to the slow cooker for 5-10 minutes.

Step 7

Serve!

Notes About Recipe

Pairings
Serve it with broccoli, over rice topped with green onions and sesame seeds.

Leftovers
Refrigerate in an airtight container up to 3 days or freeze for up to 6 months.

Download Recipe

Click here to download a pdf version of this recipe.

Affiliate disclosure: this blog contains affiliate links. This means that if you click through a link and make a decision to purchase, we will receive some compensation from the vendor; at no cost to you.


Want to try new recipes? Input your email below to recieve a weekly email with 1 recipe and nutrition tip; this is a comfortable way to learn more about nutrition and explore new recipes.

Get Social With Us

Ozempic Unveiled: A Game-Changer in Weight Management?

Ozempic Unveiled: A Game-Changer in Weight Management?

Dan Feldman, RD, has contributed to information in this blog post.

In the constant quest for effective weight loss solutions, the pharmaceutical world has introduced a new player: Ozempic. Initially a diabetes medication, now it’s being gaining attention to help with weight loss. But is this truly the holy grail of weight loss? In this article, we’ll dive into what Ozempic is, how it works, its pros and cons, and what you need to consider before using it.

Understanding Ozempic

Ozempic is the brand name for a drug called Semaglutide; other brand names for different semaglutide formulations are Wegovy and Ryebelsus. Ozempic was originally a drug created for diabetes management, to help people control their blood sugar levels (keep them lower). The drug was very effective at this, and interestingly researchers were also finding consistent weight loss.

How Does Ozempic Affect Weight Loss?

Semaglutide belongs to a class of drugs called GLP-1 receptor agonists, which mimic the effects of a hormone called glucagon-like peptide-1 (GLP-1) in the body. GLP-1 regulates blood sugar levels by increasing the production of insulin – the hormone that brings blood sugars down, and inhibiting glucagon – the hormone that increases blood sugar release from the liver. GLP-1 also helps reduce appetite. 

GLP-1 affects the brain’s hunger center, leading to reduced appetite and increased feelings of fullness. This unique mechanism of action has earned Ozempic the spotlight as a potential game-changer in the world of weight loss. GLP-1 also slows down gastric emptying (slows down food moving from your stomach into your intestines to be digested), making you feel “full” longer than you normally would. This helps increase the time between meals and snacks where you might feel hungry.

Essentially, semaglutide helps people adhere to a reduced-calorie diet.

Dosing

Ozempic is typically administered once weekly through a subcutaneous injection. The recommended starting dose is 0.25 mg, gradually escalating to the maintenance dose of 1 mg to optimize both glycemic control and weight management. The injection is easy to self-administer, involving a small, thin needle that delivers the medication under the skin, usually in the abdomen or thigh. The once-weekly format not only simplifies the regimen but also enhances adherence, offering individuals a convenient and effective means of incorporating Ozempic into their weight loss journey.

The Pros of Ozempic for Weight Loss

  • Appetite Suppression: By reducing appetite and increasing fullness, ozempic can make it easier to make healthier food choices and avoid overeating.
  • Steady Weight Loss: Studies that have used Ozempic have shown that individuals using Ozempic experience steady and sustainable weight loss over time as long as they continue to use it.
  • Improved Blood Sugar Control: For individuals with type 2 diabetes, Ozempic offers the added advantage of better blood sugar control. By facilitating both weight loss and blood sugar control, it can greatly benefit individuals with type 2 diabetes.
  • Potential Cardiovascular Benefits: Some research suggests that Ozempic might improve heart health, by reducing the risk of cardiovascular events. As individuals with obesity are often at higher risk for heart-related issues, the cardiovascular benefits are crucial.

The Cons of Ozempic for Weight Loss

  • Side Effects: As with any medication, Ozempic has potential side effects – possibly higher than other medications. These side effects include nausea, vomiting, diarrhea, abdominal discomfort, and acid reflux. While these side effects often subside over time, they can be challenging to manage initially.
  • Long-Term Safety: Researchers are still studying Ozempic’s long-term safety as a weight loss drug. Since Ozempic is a relatively new weight-loss drug, unforeseen risks might only become apparent after prolonged use.
  • Injection: Patients administer Ozempic via injections. This aspect might be a hurdle if you fear needles or struggle with self-administration.
  • Cost: Ozempic is expensive. In Canada each pen costs around $300 CAN, and is not usually covered by benefit plans. Each pen, depending on the individual’s dosing, lasts about a month.
  • Loss of Muscle: While patients taking Ozempic experience significant weight loss, much of that weight loss tends to be muscle. Patients taking Ozempic should engage in weight-bearing exercise and eat a high-protein diet to minimize losses in muscle mass.
  • Accessibility: In Canada it is not easy to get prescribed Ozempic by your doctor since Health Canada hasn’t approved it as a weight loss drug.

Permanent Weight Loss?

When discontinued, weight regain is possible — especially if you haven’t made any long-term lifestyle (diet and exercise) changes.

Is Ozempic Right for You?

Deciding whether Ozempic is right for you requires careful consideration. You need to consider your individual health circumstances, preferences, and the potential impact on your lifestyle. You should have open and honest discussions with your healthcare team, particularly your doctor and registered dietitian, and ensure they monitor and support you along the way. In Canada most Doctors won’t prescribe it unless you have a pre-existing health condition (e.g., diabetes, cardiovascular disease) that makes weight loss a priority; they don’t just prescribe it because you want to lose weight.

Mike’s had clients that have seen a lot of success with Ozempic, while others have had some pretty bad side effects (diarrhea, feeling nauseas whenever eating). Ozempic, and any formulation of semaglutide (e.g., Wegovy, Rybelsus), is not a standalone solution for weight loss, and shouldn’t be used in replacement of a balanced diet, regular physical activity, and sustainable lifestyle changes. You’re a good candidate for Ozempic if you have these foundational practices in place, but still struggle with weight management – especially hunger and cravings. And, If you do take Ozempic, it’s highly recommended to engage in weight-bearing exercise and eat a high-protein diet to minimize losses in muscle mass.

Recipe: Customizable Chia Pudding

Recipe: Customizable Chia Pudding

Customizable Chia Pudding

Skill Level

Easy


Time

12 hours

Serves

2

Calories

147

Protein

10g

Fat

11g

Carbs

14g

Equipment Needed

  • Small-medium tupperware

Ingredients

Prep:

  • ¼ cup (30g) chia seeds
  • 1 ½ cup almond milk

Before eating:

  • For sweetness: 2 tsp maple syrup/honey (2 second drizzle)
  • For more protein, and flavor: ½ scoop (20g) vanilla protein powder
  • For more sweetness and fiber: berries
  • For texture: shredded coconut flakes, or chopped up almonds/pecans/pecans

Instructions

Step 1

Mix the chia seeds and almond milk, split into two containers and place in the fridge for 12 hours.

Step 2

Mix the chia seeds and almond milk, split into two containers and place in the fridge for 12 hours
Before consuming: add Ingredients of your choosing.

Notes About Recipe

Feel free to change how much chia seeds you add for different texture, the best ratio tends to be around 1:4/5 (chia:milk)

Did you know chia seeds are:

  1. High in fiber, protein, and calcium. They are also high in B vitamins, iron, phosphorous, zinc, and magnesium.
  2. Chia seeds are rich in Omega 3s. Just 2 tbsp of chia seeds have the same amount of heart-healthy Omega 3s as four ounces of salmon.
  3. They’ve been shown to help you feel full. Chia seeds can expand up to 10 times their size by soaking up liquid, which can help keep you hydrated and aid in the digestion process.

Download Recipe

Click here to download a pdf version of this recipe.

Affiliate disclosure: this blog contains affiliate links. This means that if you click through a link and make a decision to purchase, we will receive some compensation from the vendor; at no cost to you.


Want to try new recipes? Input your email below to recieve a weekly email with 1 recipe and nutrition tip; this is a comfortable way to learn more about nutrition and explore new recipes.

Get Social With Us

Recipe: Butternut Squash Soup

Recipe: Butternut Squash Soup

Butternut Squash Soup

Skill Level

Moderate

Time

50 min

Serves

6

Calories

111

Protein

2g

Fat

5.3g

Carbs

16g

Equipment Needed

Ingredients

  • 4 tbsp soft margarine
  • 1/2 cup chopped onion
  • 1/2 cup chopped celery
  • 1 cup chopped carrots
  • 1 cup cubed potatoes
  • 3 cups butternut squash
  • 2 cups low sodium chicken stock
  • salt and freshly ground black pepper to taste


Instructions

Step 1

Cut up all the vegetables.

Step 2

Melt the margarine in a large pot.

Step 3

Add the vegetables (onion, celery, carrots, potatoes, and squash) to the pot and cook for 5 minutes.

Step 4

Add chicken stock and bring to a boil.

Step 5

Once boiling, reduce heat to low, cover, and simmer for 40 minutes.

Step 6

Use an immersion blender (like this one), and blend until thick and smooth. If it’s still pretty runny turn up the heat to medium high and evaporate off more liquid until your desired thickness.

Step 7

Season with salt and pepper.

Notes About Recipe

  • You want a thicker consistency to that it has a creamy texture. If you find that it’s not that thick at the end, boil off some of the water or use a starch like cornstarch (1 tbsp at a time) to thicken it up.

Download Recipe

Click here to download a pdf version of this recipe.

Affiliate disclosure: this blog contains affiliate links. This means that if you click through a link and make a decision to purchase, we will receive some compensation from the vendor; at no cost to you.


Want to try new recipes? Input your email below to recieve a weekly email with 1 recipe and nutrition tip; this is a comfortable way to learn more about nutrition and explore new recipes.

Get Social With Us

Recipe: Honey Garlic Slow Cooker Meatballs

Recipe: Honey Garlic Slow Cooker Meatballs

Honey Garlic Slow Cooker Meatballs

Level

Easy

Time

35-40 minutes

Recipe Servings

9 (1 Serving = 8 meatballs)

Calories

241

Protein

17g

Fat

12g

Carbs

18g

Ingredients

  • 2 lb meatballs (fully cooked, frozen)
  • 1/3 cup honey
  • 3 Tbsp brown sugar
  • 1/2 cup ketchup
  • 3 Tbsp low sodium soy sauce
  •  Tbsp olive oil
  • 3 cloves garlic, minced
  • Optional: 1/2 Tbsp red pepper flakes

Instructions

Step 1

In a medium bowl, add the honey, brown sugar, soy sauce, ketchup, oil, garlic, and red pepper flakes. Mix well to combine.

Step 2

Pour the frozen meatballs into the basin of slow cooker.

Step 3

Pour the sauce over the meatballs.

Step 4

Cover and cook on HIGH for 2.5-3 hours or LOW for 4-6 hours.

Step 5

Stir occasionally (so sauce doesn’t get caked to the side and/or burn) and serve.

Side Suggestions

Quick options:

  • 1/2 to 1/3 bagged salad
  • 1/2 to 1/3 package Uncle Ben’s Rice


Want to try new recipes? Input your email below to receive a weekly email with 1 recipe and nutrition tip; this is a comfortable way to learn more about nutrition and explore new recipes.

Get Social With Us